“No plan survives contact with the enemy” – Helmuth von Moltke
Moltke, a German military strategist, was of course referring to battle plans, but the same is true with Google AdWords campaigns. The best planned ad campaign will not survive contact with your competitors…
In other words, planning and setting up your AdWords campaign is only half the battle. The other half is optimizing your campaign once it’s live. Even the best, most perfectly set up campaign will ultimately fail if it’s not managed properly.
What does it mean to optimize your campaign?
Once a Google AdWords campaign is live, then there will be 3 core areas that must be continually monitored and improved. These 3 areas, which we refer to as the “3 Ingredients,” are where virtually all of your testing and optimization efforts should be focused.
Ingredient #1. Ad Targeting
If your ads are not targeting your ideal customers then your campaign doesn’t have a shot at success. During the initial campaign setup, you found all the relevant keywords you think your ideal customers are searching, but you never know for sure until your ads go live.
In addition to keywords, other targeting factors include geographic location, device, and time of day. All of these factors must be analyzed to determine the ideal targeting for your campaign.
Ingredient #2. Ad Copy
Assuming your ads are targeting the right audience, then the next critical factor is your ad copy. Again, a lot of work goes into ad copywriting before your ads go live, but there’s a good chance the first drafts of your ads will not survive long. You’ll need to continually test new ad copy to determine what works best for your ideal customers.
Ingredient #3. Landing Pages
Once a prospective customer clicks on your ad, then it’s up to your landing page to convert the website visitor into a lead or sale. It’s important to note that the landing page performance depends greatly on the targeting and ad copy discussed above.
These are numbered in order on purpose. A perfectly designed landing page will fail miserably if you’re not using the right ad targeting and ad copy. Focus on your targeting, then your ad copy, and then make sure your landing page is congruent.
Within each of these 3 ingredients there are dozens of elements that can be enhanced through testing, which can maximize the performance and ROI of an AdWords campaign.
And the key to success is to make sure that you’re following a checklist. It’s like cooking using one of those recipe and instruction cards from Blue Apron. On the card you see all the key ingredients and a step-by-step process for how you’ll carefully mix those ingredients to create a delicious meal. I’m sure you know what happens if you’re not an experienced chef and you try to wing it while cooking. Well, the same is true with AdWords.
Now, let’s dive into each ingredient to take a closer look at what needs to be done…
Ingredient 1. Optimize Your Ad Targeting
Ad targeting sounds simple, but there are actually a lot of factors at play. Here are the 3 key areas you need to consider when optimizing your ad targeting:
- Keywords
- Bids
- Campaign targeting
As we go through these 3 areas, we want to find opportunities to cut out anything that is not working and is wasting your advertising budget. At the same time, we want to find opportunities to reallocate the budget that was being wasted to the targeting that is performing well.
By simultaneously cutting out what’s not working and investing more in what’s working, you’ll see rapid improvements in campaign performance.
Keyword Optimization
One of the most critical targeting factors in a search campaign is your keyword selection. Assuming you launched your ads with keywords your ideal customer is likely to search, then you should have a head start on the optimization process.
However, it’s impossible to know every single keyword variation that is going to perform well and many of the keywords that looked great on paper will simply underperform for whatever reason.
Don’t get frustrated if your initial keyword list is not profitable right out the gate! Most keyword lists require a lot of TLC to find the best phrases for your business.
In this section, I’ll walk through several tactics you can use to fine tune your keyword list once the ads are live.
The first is called pruning…
Keyword Pruning
The goal of pruning is to delete keyword phrases that are irrelevant or are generating clicks, but not conversions.
You can find this information by going to your AdWords account, clicking on the ‘Keywords’ tab and then clicking on the “Search terms” subtab. This report shows you the exact keyword phrase that was searched when your ad was displayed. Sort by Clicks to see which keyword phrases have a history of clicks but no conversions.

To start pruning, focus on the keywords that are not relevant to your products or services. For example, if you only sell women’s shoes, exclude any keywords that include “men’s” in the phrase. The key benefit here is that pruning costly but non-productive keywords will save money, which can be re-allocated to keywords that are generating conversions.
Next, we can prune by using negative keywords.
Negative keywords can be added to your campaign or ad group to prevent your ads from being shown for specific searches. This will effectively narrow the audience that sees and clicks on your ads to the prospective customers that are most likely to call your business, visit your location and/or make a purchase.
Here’s an example of how designating negative keywords can help a plumbing business…
Let’s say the business is using “plumber in NYC” as a phrase match keyword in a campaign designed to attract new customers. This company’s ads could be displayed when people enter search terms like “jobs for a plumber in NYC”. In this situation, when a person clicks on the ad, the money spent for the click is wasted because the searcher is looking to get hired, not to hire a plumber. By adding “jobs” as a negative keyword, the plumbing company would avoid wasted clicks by preventing the ads from being displayed for searches that include that term.
Negative keywords can be selected for either the campaign or the ad group level. The plumbing company mentioned above could list “jobs” as a negative keyword at the campaign level, meaning that none of the ads would be displayed for searches that include the term.
At the ad group level, listing negative keywords can sharpen the targeting of each ad. For example, an HVAC company that offers heating and air conditioning services could designate “heating” as a negative keyword for its air conditioning ads and exclude “air conditioning” in its heating ads. That way the ads in each ad group can be 100% relevant based on the searched keyword.
Next, let’s prune by Quality Score.
Google will rate each of your keywords using a Quality Score based on the expected clickthrough rate, the relevance of the ad and the behavior of visitors when they arrive at the landing page. These scores range from 10 (the highest score) down to the lowest rating of 1. High Quality Scores can give your ads better positioning at lower costs-per-click.
To find the Quality Scores for your keywords/ads, click the ‘Keywords’ tab. You can then click the white speech bubble next to each keyword to find the Quality Score.

To get started, I recommend you remove all keywords with Quality Scores of 3 or lower. These keywords will drag down the Quality Scores of other keywords in your ad group. In other words, a few bad apples will rot the entire basket! If you don’t want to remove them completely, then I recommend you create a new campaign where you continue to test these low quality score keywords without “rotting” your other campaign.
Next, work to improve the scores of the keywords ranked between 4 and 6. In the same place you found your Quality Score, Google provides evaluations of the clickthrough rate, ad relevance and the landing page experience. The evaluation on each ad can point to weaknesses that, when fixed, can improve each Quality Score.

For example, if ad relevance is below average, you may be able to improve the Quality Score by adding the keyword that has been targeted in the ad copy to the headline of the ad. If the landing page is rated at below average, it’s probably because visitors are bouncing off shortly after they arrive. This would suggest that the landing page content needs to be tightened up around the targeted keyword in the ad.
Next, it’s time to prune by cost per conversion.
Some of your ads may be converting, but at a cost that makes each sale unprofitable. If you know your customer lifetime value, then you know how much you can invest to get a new customer and still make a profit. If you didn’t set those benchmarks earlier, do it now!
The cost per conversion for your keywords will be automatically tracked if you set up AdWords conversion tracking. If you did not set up conversion tracking, then pause your ads and set that up immediately. Without tracking in place you’re flying blind and won’t be able to complete this critical optimization step.
When you find unprofitable keywords, then try lowering the bids to get the keyword profitable. If that doesn’t work, then you may need to pause the keyword altogether. If the keyword is generating a lot of conversions, then you’ll want to test the keyword again after you’ve gone through the other steps to optimize your ads and landing pages.
OK, that’s enough pruning… Now it’s time to go fishing!
Fishing for Keywords
The goal of fishing is to find additional keywords that either look promising or are already converting, but you’re not yet specifically targeting the search phrase.
Like pruning, fishing starts with the Search terms report. Sort by conversions and review the search phrases to find new keyword opportunities to add to your existing ad groups (if they are relevant) or create new ad groups for these keywords.
This leads to another important optimization tactic…
Replanting Keywords
Replanting is the process of moving your best performing keywords from a campaign that contains lower performing and unproven keywords, to a completely separate campaign that contains only high performing keywords. Separating your keywords this way delivers the following advantages:
- More control of your budget. When all of your keywords are in one campaign, you can’t easily focus your ad spend to the best performing keywords. By creating a separate campaign for your top performers, you can allocate more money to the keywords that are converting and limit your exposure on the poor performing keywords.
- More accurate reporting. When your top performing keywords are in one campaign, then it’s easier to spot trends (up or down) when reviewing campaign level stats. If all your keywords are in one campaign, then the low performing keywords will skew your campaign level reports and make them less useful for spotting trends.
- Higher Quality Scores – As mentioned above, poor performing, low Quality Score keywords will drag down the Quality Scores of other keywords in the same campaign. Plus, when you isolate your top performing keywords and optimize your ads and landing pages for them, then you’ll further improve your Quality Scores.
Also, consider replanting keywords based on geographic targeting or day-parting. For example, setting up separate campaigns for different states may make sense if certain ads work better in one state than another.
Or, if you find that a keyword converts on weekdays, but doesn’t convert very well on weekends, then you could set up separate weekday and weekend campaigns. Again, this would give you more control over your budget, improve your reporting, and lead to higher Quality Scores.
Now it’s time to switch gears and focus on your bids…
Bid Optimization
The main objective of bid optimization is to determine the keyword level bids that will result in the most profitable conversions for each keyword.
Therefore, to bid effectively, you must have conversion tracking set up in your AdWords account so that you’re measuring conversions at the keyword level. Do that now if it’s not already set up and then come back once you start to see conversions in AdWords.
Warning: This will require some basic math. If you hate math and numbers scare you, then don’t panic. I promise to keep this simple.
Here’s an overview of what we’re going to do:
- Determine how much you can profitably pay for a conversion. This depends on your business, your customer lifetime value, and exactly what you’re calling a conversion (e-commerce sale, demo request, phone call, etc.).
- Measure the conversion rate for each keyword using AdWords conversion tracking.
- Determine your maximum cost per click, which is the maximum you can pay for a keyword.
Here’s an example of how this works…
Let’s say you have determined that you can afford to pay $100 for a conversion. Let’s also say that you have a keyword that has a 2% conversion rate. To find your maximum cost per click, you can simply multiply the conversion rate by how much you can afford to pay. In our example, we would multiply 2% by $100 to get $2.
That means we can profitably pay up to $2 for this keyword.
Note that this calculation needs to be done separately for each keyword because your keywords will likely have different conversion rates. For more advanced marketers you may recognize the fact that the lifetime value may vary per keyword and that’s true. For more advanced bid optimization you should use the different conversion rates and different maximum amounts you can afford to pay for each keyword.
If you are just getting started with AdWords and don’t have conversion data, my suggestion is to prune your keywords down to a core group and then bid as aggressively as you can within your budget. Being aggressive with your bids will put your ads in prime position to get more clicks and give you a better chance to start collecting conversion data.
As the conversion data starts to build, you can start replanting the performing keywords in a single campaign and dedicate most of your budget there. The balance of your advertising budget can be allocated to run tests on low-converting and unproven keywords in a separate campaign.
Finally, we need to review your campaign targeting…
Campaign Targeting
So far we have focused on keyword selection, keyword organization, and bids. Now it’s time to look at your campaign performance per device, geographic area, and time of day.
Device Targeting
Ad performance will likely vary substantially depending on which device the prospective customer is using. For example, mobile device traffic generally has lower conversion rates than desktop traffic. So if you’re reviewing data that is aggregating both devices, you’re not getting the full picture.
It’s very possible that your campaign is performing well for desktops, but very poorly for mobile devices. Overall that could mean your campaign is unprofitable, but if you cut out the mobile targeting, then it could instantly be profitable!
To review your overall campaign performance by device, go to Settings > Devices as shown below.

That report will give you a high level view of your campaign performance by device. Plus, on this page you can adjust your mobile device bid from -100% (negative 100% turns off mobile targeting) all the way up to +300% (increase your mobile bid by 300% of your desktop bid).
Now, if you notice an issue with a device, you’ll need to dig in deeper at the keyword level. To do this, go to the Keywords tab and then click on the Segment button and select Device.

As you can see, this report will show you how each keyword is performing per device so you can see exactly what’s going on. If you find that all keywords are simply not performing for mobile devices, then turn off your mobile targeting. If you find that some keywords do perform well, then replant them into another campaign that targets mobile and turn off mobile targeting in the existing campaign.
Geographic Targeting
To review your campaign performance by geographic location, go to the Dimensions tab, then click the View button and select “Geographic.” Then click on the Columns button to add or remove columns in the report. You can drill down from countries to individual zip codes, depending on how specific you need or want to get.

Sort this report by cost to see where you’re currently allocating your ad budget. Then sort by cost per conversion to see which locations are the most profitable and which are unprofitable.
Finally, go to Settings, then Locations to add or exclude locations from your campaigns.

Time Targeting (Dayparting)
Before we move on from targeting, it’s important to review how your campaign is performing by time of day and day of week.
It’s very likely that your campaign performs better during certain times of the day and certain days of the week. For example, a pizzeria would likely see more conversions during lunch and dinner hours than in the early morning. In this situation, the pizzeria could scale back bids when conversions are minimal and then bid more aggressively during lunch and dinner hours.
To report on performance by time, go to the Dimensions tab, then click the View button to select Time, and finally select time of Day of Week or Hour of Day.

If you find you need to adjust your bids based on the time of day or day of the week, then go to the Settings tab, then click Ad scheduling. From here you can set your ads to run during certain days or hours of the day and/or set bid modifiers to adjust your bids up or down.
Now that we’ve reviewed our targeting and we’re confident our ads are showing when they are most likely to convert, it’s time to change our focus to the ad copy…
Ingredient 2. Optimize Your Ad Copy
In this section I’m going to assume your ads are:
- Organized into ad groups so that the ad copy matches all the keywords in the ad group
- Targeting your ideal customers
- Displaying when your ideal customers are most likely to convert
If you have not gone through the steps above, then stop, scroll up and complete “Ingredient 1”. The best ad copy in the world will fail if it’s displayed to the wrong people at the wrong time!
OK, back to your ad copy…
In order to optimize your ad copy, you must test different ad variations to see what works best. This process is called split testing.
For example, if you want to test 2 ad variations, then you would show 50% of your audience variation A and the other 50% would see variation B. Over time, you would see which ad variation gets the higher click-through rate and which variation leads to more conversions.
So what should you test?
Here are the 5 ad components you need to focus on:
- Offer
- Headline
- Description Lines
- Display URL
- Ad Extensions
The Offer
The offer you present in your ads is by far the most critical component. A weak offer compared to your competition is not going to drive much traffic and conversions because most people will click on the more compelling offer.
Don’t make this more complicated than it needs to be. In my experience, many businesses do not have compelling offers and that is the #1 reason why the ads underperform.
Important Note: One of the biggest factors in your Quality Score is your click-through rate. That means, if your click-through rate is low versus your competition, then you’re going to struggle to get a high Quality Score. That also means you’ll need to bid and pay more for top placement. This is why your ad copy is so critical – Compelling ads lead to lower costs, more traffic, and more conversions!
If you’re not sure what to offer, then start by reviewing your competitors who are already advertising on your target keywords. Remember, your prospects are going to see these ads and then make a decision to either click on your ad, or your competitor’s’ ads.
What could you offer that would stand out?
To get you started, here are 5 different types of offers that you could make:
- Free Sample – Example of this type of offer is a free demo of your product or service. This allows prospective customers to give your product or service a try with no commitment. However, once people get moving in your direction, then you’re more likely to continue that momentum through to a sale.
- Special Discount – Everyone is familiar with discounts. The problem with competing on price is that there tends to always be another business that is willing to go just a little bit lower. So be careful if you choose to go down this path.
- Strong Guarantee – A satisfaction or money back guarantee strengthens an offer by assuring customers that they will get what they expect from the product or service. Another term used in this type of offer is a “no-risk guarantee” that promises a refund if the customer isn’t satisfied.
- Free Gift With Purchase – Everyone loves free and your ads can stand out from the crowd if you offer something for free when new customers sign up.
- Free Information – Giving free information can be effective, especially for complicated products or services. For example, an attorney that provides a free white paper on the essential aspects of estate planning could use the offer as a lead generator that brings in new clients.
Use the list above to brainstorm new offer ideas and then create new ads to test them out in your campaign.
The Headline

The headline of your ad is the first thing that prospective customers will read after searching in Google. There are two goals with your headline:
- Match what your prospective customer is searching for. In other words, make sure your headline is 100% relevant.
- Stand out from the competition.
To accomplish the first goal, you can add the core keyword in your ad group to the headline of your ad. This will tell Google that you’re 100% relevant, which improves your Quality Score. Plus, prospective customers will know right away that your ad is relevant to their search query.
To accomplish the second goal, you must review the competitor ads. How can you write a unique headline that will still be 100% relevant? For example, test phrasing the headline as a promise and then create another version of the same headline as a question. That simple change could make a big difference in your ad click-through rate.
The Description Lines

Once you’ve caught your prospective customer’s attention with the headline, then your description lines need to explain your offer and encourage clicking through to learn more.
One of the easiest tests to run is to flip your description lines to see if the order makes a significant difference. Next, test emphasizing different benefits of your offer to see which benefit resonates the most with your target audience.
Also, if appropriate, test qualifying language that ensures only qualified prospects click on your ad. For example, if you’re a financial planner who only works with people of a certain net worth, then you can specify that amount in your ad. This tactic can reduce your click-through rate, but substantially increase your sales conversion rates.
The Display URL
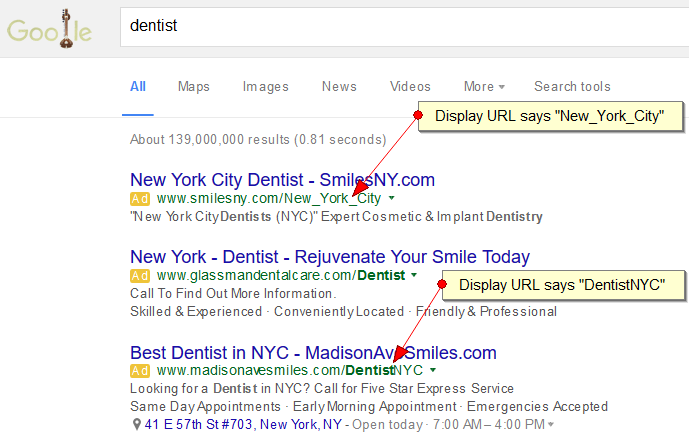
The display URL displayed beneath the headline in your text ads, but it doesn’t function as an active link.
Google requires that the root domain name be included in the display URL, but you have the flexibility to add a subdomain or subfolder to the domain displayed. This is a great place to reiterate your offer, specify your store/office location, or show a call to action.
Ad Extensions
Last but certainly not least are ad extensions. Google recently started including ad extensions as part of your Quality Score, which makes them even more important for the success of your campaign.
There are 5 main types of ad extensions that every business should set up:
- Call extensions display either the phone number for your business or a forwarding number provided by Google. Using the forwarding number allows Google to track calls generated by your ads.
- Location extensions link your ad to a Google My Business page where your address will be displayed.
- Sitelinks extensions allow you to provide links to additional landing pages.
- Callouts extensions are like bullet points where you can provide more information about your offer and your business in bullet point format.
- Structured snippets extensions allow you to add a list of items to your ads. For example, if you sell certain brands then you could create a list of brands, or if you provide certain services then you could list those services.
- Review extensions display third party endorsements. An example would be, “A+ accredited business by the Better Business Bureau”.
Below are examples of the extensions in Google’s search results:


The more extensions that Google can use in the search results, the more real estate your ad will take up on the first page of Google. The bigger the ad, the more clicks you’ll tend to get.
Of course, getting clicks on your ads is just the beginning of the process. Next, you have to convert the traffic into leads and sales with your landing page…
Ingredient 3. Optimize Your Landing Page
At this point, you have optimized your ad targeting and your ad copy to get prospective customers to your site with cost-effective clicks. But all that work will be nothing if your landing page is not set up and optimized to convert this traffic into leads and sales.
Important Note: Your website homepage should not be used as your landing page. This is because the typical homepage tends to be more general in terms of subject matter, often serving to introduce the business and its products/services. Each landing page needs to be tightly focused around the specific product/service and the offer promised in the ad.
What if you have multiple ads and multiple offers based on the optimization steps above?
You probably already know the answer, but you’re hoping it’s not true… Sorry, but that means you need to have multiple different landing pages that match those different ads and offers.
With advertising, congruence is absolutely critical. When your prospect customer clicks on your ad, then she expects to find exactly what your ad promised front and center at the top of the page (not buried down the page).
To ensure congruence, you need to match the headline on your landing page with the offer in the ad. That way it’s 100% clear that the prospective customer is on the right page. Remember, it’s easier to click the back button than it is to click around on a new site to find what you need.
So what makes a good landing page? Here is a checklist you can use to evaluate each key area of your landing pages:
- The Headline – A compelling headline should be positioned at the top of the page that is 100% congruent with the ad that was clicked on. A quick tip to create congruent landing pages is to simply edit the headline and keep the rest of the page the same.
- Benefit-Focused Content – The copy on the page should highlight the benefits of your product or service.
- Your Unique Selling Proposition – Your USP explains what makes your product/service better than what your competitors are offering. In other words, why should anyone choose your business over your competitors?
- Your Offer – Your landing page should expand on the offer promised in your ad copy.
- Social Proof – Social proof is critical with digital marketing because most people are skeptical of unknown businesses online. The best way to build trust with prospective customers is to publish testimonials and case studies on your landing page.
- Credibility indicators – This is yet another way to establish trust with your prospective customer. Examples include memberships with the Better Business Bureau and the local Chamber of Commerce.
- Call to action – Make buying simple for customers with explicit directions and easy to find buttons to take the next step in the sales funnel.
To see this in action, below is an example of an ad and the corresponding landing page that matches the copy in the ad.


Once you’ve gone through the list above and incorporated each element, then it’s time to test. Start by testing different headlines to see which message gets the highest conversion rates. Also, test the landing page layout to try to include your call to action at the top of the page before the visitor needs to scroll.
Remember, your campaign will likely need multiple landing pages and you’ll need to optimize each one separately.
And Finally… Make Optimization a Habit.
As you can tell at this point, there will always be new opportunities to test in each key area of your AdWords campaign. AdWords optimization is not a one time event!
You need to make it a habit to continually test your targeting, your ad copy, and your landing pages if you want to maximize your return on investment.
About the Author: Phil Frost is Co-Founder of Main Street ROI, an online marketing, training, and coaching company based in New York City. Want more AdWords tips? Get your free copy of Phil’s Ultimate Google AdWords Checklist.


from The Kissmetrics Marketing Blog http://ift.tt/1XjCM6a

from WordPress http://ift.tt/1saPGrO
No comments:
Post a Comment