Wednesday, November 2, 2016

7 Lessons from Top Performing Drip Email Campaigns

Automated email workflows can net you 20% more sales opportunities.

They’re more personalized, timely, and targeted.

The problem, is that the vast majority of marketers – as high as 85% – are unhappy with their performance.

Not the results of those campaigns. But of their own execution or implementation of them.

Instead of rehashing the same onboarding campaigns from the same companies that others have covered well, I spent a Sunday morning digging through my inbox to find examples from different industries. (Sounds like a fun weekend, right?!)

The objective, was to pick out different campaigns at random that were each utilizing different personalization techniques to give you a fresh approach and hopefully inspire new ideas.

Here are seven (plus one special bonus) to emulate, research, and try for yourself.

1. Time Etc. Specific Task Spotlight

Tell me if this sounds familiar.

You find (or hear) about a new amazing service.

First pass, it looks awesome. So you sign up, mess around for a few minutes, and… ?

You hit a wall. A blank. And you’re not sure what to do next.

There’s a reason the vast majority of free trials (~50%) don’t turn into free accounts. People aren’t sure what to do next, and they haven’t seen that ‘first win’ yet.

UK-based, virtual assistant service, Time Etc., sends an early task or feature highlight to new sign-ups who haven’t used the service yet. The goal is to avoid this decision fatigue by helping to prompt people with specific ideas for what to do next.

For example, this one focuses on creating a new repeating task.

time-etc-repeating-task-email

The single column email is just long enough to provide context to a user, before expertly using a primary (create the task now) and secondary CTA (learn more) to get started.

The hope, is that these leading emails can jog some ideas in those reading it, getting them thinking about ways around the initial problem that blocked them from taking the first critical step in the first place.

2. Rock & Roll’s Event Repurchases

The Rock & Roll Marathon Series has grown from humble beginnings in my beloved San Diego, to now stretching out across most major U.S. (and some European) big cities.

They now regularly feature 30,000+ attendees running urban courses with bands, DJs, and more every mile or two of the half and full marathon routes.

As anyone’s who’s thrown an event can tell you, they rely heavily on early sign-ups (even at discounted prices) and repurchases (from past happy attendees) to help forecast and make up for the fact that most will wait until the very last second (and they’ve already shelled out the money to organize everything upfront).

That brings up two key segmentation features:

  1. By Location
  2. By Event

Let’s start with the basics:

rock-n-roll-marathon-arizona-email

The first example highlights a simple event segmentation, sending a scarcity-based promotional message that would make even Cialdini happy.

This one’s relatively straightforward, relying on the urgency of an early pricing discount expiring to be the entire messaging.

The second, is slightly more nuanced.

rock-n-roll-marathon-san-diego-email

This one is pulling in the (1) event and (2) location details to inspire (and hook) those who just completed that specific event in that specific city to repurchase.

Receiving these, in a succession of months, with the aforementioned urgency-based price increases, are like a war of attrition that slowly but surely whittles away a large list to capture as many early purchases as possible.

This example, along with the Time Etc. one before it, were relatively basic time sensitive examples (where campaigns are sent X days out from Y trigger).

Time to get a little more sophisticated.

3. Expedia’s Recent Booking Abandonment

A hotel booking process is no different than an eCommerce checkout one when you think about it.

A sample of people begin the process, selecting dates (like products) to see how much the grand total might be, before getting distracted (or jumping over to a different product or website to compare prices) and leave the site.

The statistics are also (unfortunately) similar. While as many as 67% of eCommerce people might abandon a cart, 81% of people booking a hotel or travel might bounce as well.

The good news, is if this user’s logged in, you can track and react.

Case in point: Expedia sends these behavioral, event-based messages shortly after searching for hotels in specific locations.

The first example pulls in the specific city name in the subject line of the email, while the body copy tends to be a little more generic, focusing on the ‘upsell’ of booking an entire package vs. just selecting a hotel.

expedia-recent-booking-email

The second, features a subject line that’s almost an exact carbon-copy of the first (complete with personalized city-name).

However this time, the second one also features a customized message that personalizes the (1) headline, the (2) body copy, and the (3) CTA.

expedia-hotel-deal-email

This campaign successfully executes on message match; aligning what a user was just thinking about and doing on your site with the subject line (that will get their attention), and the email content (to get them to click).

4. Ramit’s Warm-Up to Pre-Sell

There’s one sure-fire way to learn from other marketers:

Ignore what they say, and watch what they do.

Some of the best digital marketers pull off a sleight-of-a-hand like a Vegas magician; distracting you with one thing over here while they’re really laying the groundwork for a powerful move later in the act.

There’s no better example of this than Ramit Sethi.

Subscribe to his email list (with a different email or at least some kind of filter) and watch the magic literally unfold.

You’ll get tons (and tons and tons and tons) of text-based emails that do everything from grab attention, to engagement and trust building, before finally witnessing these brilliantly executed sales emails.

First, you’ll be pre-segmented based on what offer (or where on the site) you opted in. Then you’ll receive a mix of content that will switch from the regular ongoing stuff to more choreographed sales efforts.

Typically you can see these coming with an anticipation-inducing “Day 1/X” in the subject line. The copy itself will start layering in social proof (like the number of comments, the number of emails, etc.) before closing with a specific call-to-action to get the reader from passive-to-active.

Here’s one good example:

ramit-sethi-hate-mail-email

These start out slow. But watch how they build over the course of a few days (to a few weeks for the larger ones), increasing frequency by as much as 2-3 emails per day and altering the messaging based on if you don’t respond, open, or click.

Watching how Ramit seamlessly transitions from focusing on problems and pain points to eventually providing a solution for those should help you not only rethink your email strategy, but all of your content marketing efforts too.

5. Audible’s Proactive Churn-Reducing Outreach

Subscription-based services can be profitable. But it usually takes a few months.

They’re capital intensive businesses, that require you to front-load cash into soft costs (like salaries, etc.) and hard ones (like advertising, etc.) to acquire customers that pay a little at a time (hopefully turning cash-flow positive within a few months).

A churn rate of 5-7% might be acceptable, but anything greater can quickly send your profitability into a tailspin at an accelerated rate (working almost like negative leverage – see: Bear Stearns).

Audible does a good job sensing or predicting churn and proactively responding to hopefully avoid it.

This promotion gives away something with a high perceived value (even though giving away an extra digital copy of something costs, well, air) to ‘win-back’ a customer’s attention.

audible-last-chance-email

Highlighted in fine print at the bottom, you can see how they’re pulling out a segment of people to receive this special offer (unused credits as of a certain date).

It’s simple, but effective.

6. Mint’s Important Win-Back Notification

Mint’s another subscription based service, however they don’t charge consumers anything up front (instead relying on partnerships, revenue shares and affiliate deals).

That means they really need a sticky model that keeps people for months on end.

Deciding to take out a loan, or switch credit card companies, isn’t a decision most consumers make lightly.

They also have this uphill battle at getting people to understand or recognize the problems Mint wants to help you solve (so they can get paid) – when that consumer’s need awareness often doesn’t exist in the first place.

So… how?

mint-unusual-spending-email

Mint tracks your personalized, historical averages and then sets up notifications or alerts when new aberrations pop up.

Some categories, like spend more on Travel, might be ignored because people are generally delighted to spend there.

However highlighting other frivolous ones, like Shopping, bring up all sorts of insecurities and question marks in someone’s head.

The subject line and matching headline act like a cliffhanger; introducing the problem with a suspicious ‘power word’ (“Unusual”) before directing people to the road to salvation (that big, bright orange “Login Now” button).

7. Salesforce’s Trial Expiration Sequence

We’ve already looked at the dismal statistics of free trialers to paying customers. So let’s jump straight into the examples.

This sequence of three emails is being sent to based on the classic example: user (me in this case) logins in on the first day, before eventually failing to login back in or use the product over the next week of the free trial.

So midstream, Salesforce picks up on this and hints at it with the opening line of the email (“I’m guessing you’re swamped”).

salesforce-trial-experience-email

The messaging around it goes for the soft-sell, trying to elicit some response or engagement of any kind so they can intervene and get you back into the product.

The personalized approach, design, and tone also help make it easy (and low-stress) for someone to reach out and get help (as opposed to ‘be sold’).

After not responding for a few days, the tone switches to a more direct, hard sell.

salesforce-trial-expiration-email

Again, the same personalized style is used to get that one-to-one interaction. But this time the language is less friendly and more business (relying on scarcity yet again to drive action).

A few days later (after again not responding), a more generic re-engagement campaign goes with a ‘action required’-style subject line, and a message that lets you know there’s still time to recover your account and information.

salesforce-reengagement-email

Bonus: Inbound’s Personalized Scale Outreach

Each of the examples listed above incorporate clever segmenting and behavior-based techniques to scale personalized emails.

However one of my favorite (and most thought-provoking) examples comes from Inbound.org and Ed Fry that takes this to new extremes.

inbound-org-new-post-email

Inbound.org is a community-based site, which is completely dependent on members (of said community) logging in frequently and supplying it with content (posts, answers, interactions, etc.).

The above email incorporates extreme personalization at scale, using:

  1. My name
  2. My job title / profession (agency)
  3. My level of profile completeness (whether my Twitter is connected)
  4. My engagement (inserting these in between and other emails I receive from them)

Fortunately, Ed was kind enough to share his experience (and results) in running these personalized campaigns.

Ed likened these emails to multivariate tests (as opposed to a more general email campaign), because so many variables are at play within a single email (including the question being asked, the targeting, the messaging, and the lists being selected).

Unsurprisingly, incorporating as much specificity as possible reportedly resulted in the best engagement. So they would test subject line & messaging like:

  • Can you help Casey?
  • Can you help Casey’s client?
  • Can you help Casey’s PPC client?

In order to create campaigns like this, you need a vast amount of customer data (along with the ability to create specialized lists quickly). Here’s a sample of what they used to run these:

customer-data-in-email-campaigns(Image Source)

This extremely personalized approach is time consuming and complicated to pull off. But the results show extreme promise, too.

personalized-email-campaign-results(Image Source)

Conclusion

Average website conversion rates are a depressingly low 3% in most industries.

Automated email workflows can help dramatically… assuming you’re going above-and-beyond the basic, Hey $FNAME.

Instead, some of the best combine nurturing, timing, urgency, scarcity, and extreme personalization to break through the noise, get opened, and get clicked.

Use these seven (+1) examples as a starting point to analyze where your own are falling short, and a model for new techniques to experiment with going forward.

The glass half-full version, is that we have a lot of room for potential.

If the final Inbound.org example is anything to go off of, it’s that most of us are still scratching the surface of truly personalized, data-driven techniques that work.

About the Author: Brad Smith is a founding partner at Codeless Interactive, a digital agency specializing in creating personalized customer experiences. Brad’s blog also features more marketing thoughts, opinions and the occasional insight.

from The Kissmetrics Marketing Blog http://ift.tt/2e2AmdY


from WordPress http://ift.tt/2f1tA4Y

How to start a blog with Hostgator

Blogging is an incredibly rewarding experience; it’s one of the few times in life that you truly reap what you sow. Write a great post, and readers will find it, churn out the same old opinions as everyone else, and you’ll get lost in the crowd.

There are some excellent platforms to blog on: WordPress.com, Ghost.org, Medium.com. But if you’re serious about blogging, eventually you’re going to need to take control of your own content.

There are tons of benefits to controlling your own content. Firstly, you’re your own boss, no one can censor you; Secondly, you decide if there’s advertising on your post, and if there is, it’s you that profits; Thirdly, you have total control of your site, you can change platforms, redesign, customize the code, as much as you please; And perhaps most importantly, there’s the pride of ownership of saying “This little part of the web is my corner.”

Step 1: Choosing a host

Starting your own website might sound like a big step, but really anyone can do it. Companies like Hostgator are set up to make it as simple as possible.

The first step is to choose a hosting package. Hosting is space on a webserver. That’s where you’ll store all your text, images, and videos too if you have them.

Hostgator has several shared hosting plans. Shared-hosting means that your space will be on the same server as other people’s space, instead of having a whole server to yourself—think of it like renting an apartment, rather than renting an entire building. (Who knows, maybe one day you’ll need that whole building, but starting out, a few rooms will do.)

Sometimes it’s tricky deciding which package to choose, but there’s no need to over-commit. Sign-up to the lowest priced package you can. Remember, you can always upgrade later if you need SSL, or want to start a second blog.

picture1

Hostgator’s most popular plan is their Baby Plan, because it allows you to run multiple blogs. But if this is your first foray online, then the Hatchling Plan is enough for you.

Hostgator’s plans come with unlimited storage and email addresses. You’ll also find that they include a drag-n-drop website builder (you might have heard that called a WYSIWYG, or What You See Is What You Get) so you can build your own site without the help of a web designer. You even get a Google Adwords and Yahoo/Bing credit, so you can advertise your blog.

Once you’ve chosen just click the “Sign Up Now” button and follow the instructions on screen.

Step 2: Register a domain

A domain name is how people find you online. You need a good one if you’re going to stand out. You want it to be memorable, but unfortunately most short domains, such as “mykickassblog.com” have already been registered.

Think up some names, things that are personal to you might be more likely to be available. But remember, if you use something really crazy, and you go viral you might be stuck with it! Do you really want tell your bank manager that your business’ name is thepurplefrogsbingbong.com?

Hostgator have a tool to help you find a domain. Just type in your preferred choice and click “Search”, it will tell you if the domain is available.

picture2

It’s perfectly okay to register a domain with one company and have your hosting with another. But, if you do that you’ll be responsible for things like maintaining DNS records, and that’s server-admin level complexity. By registering your domain in the same place as your hosting, Hostgator takes care of everything for you.

Once you’ve picked your domain, you probably want to check the Domain Privacy Protection. Normally, when you register a domain, you have to tell ICANN who you are, and anyone can look up who owns the domain, including your address. If you use Hostgator’s Domain Privacy Protection your information is replaced with Hostgator’s. It’s still your domain, but no one can lookup your personal details.

Register the domain for as long as you want to (hosting is always annual) by following the on-screen instructions. Before the duration is up, you’ll need to renew to keep using the domain.

Step 3: Installing WordPress

Amazingly, you own your own website! How awesome is that! Now it’s time to get your blog up and running.

There are lots of blogging options, but the one chosen by most of the world is WordPress. It actually powers almost 1 in 5 websites, when people say blog, they often mean WordPress. Best of all, WordPress is free!

Open up your email and find the welcome email that Hostgator have sent you. You’ll see that there’s a link to your cPanel (which is simply short for “Control Panel”). Use the username and password provided and log in to your cPanel.

Look for the “Quick Install” button, and click it. Then, find the “Popular Installs”, you’ll see that WordPress is at the top.

picture3

Click on “WordPress” and fill out the form. You can change these details later, but it’s important that you don’t use the same username as your cPanel username (because two username/password combinations are more secure than one).

picture4

When you’re ready, click “Install WordPress”.

picture5

And that’s it! You’ve set up a website, and installed blogging software. All you need to do now is think of a topic for your first blog post. How about telling the world what inspired you to start blogging in the first place?

Blogging is an awesome adventure, good luck, and enjoy the ride!


[– This is an advertorial post on behalf of Hostgator –]

Jingle Bells Bundle: 125 Premium Christmas Vectors – only $9!

Source

p img {display:inline-block; margin-right:10px;}
.alignleft {float:left;}
p.showcase {clear:both;}
body#browserfriendly p, body#podcast p, div#emailbody p{margin:0;}

from Webdesigner Depot http://ift.tt/2fcoB1L


from WordPress http://ift.tt/2fhoqRv

Tuesday, November 1, 2016

We Used the Latest Holiday Selling Data to Create These Cyber Monday Hacks

I’ve always been a little skeptical of Cyber Monday. It always felt a little forced. Black Friday is a media bonanza as well, but Black Friday always seemed more discovered than created.

Cyber Monday on the other hand came off a bit manufactured. I figured that while there were certainly sales to be made from an ecommerce-centered selling holiday, the real money in online sales would be made on Black Friday as buyers become increasingly resistant to the Black Friday hype machine.

So, we pulled the data. We wanted to see how Cyber Monday works and what makes it tick. Inventory tracking is our bread and butter, so we maintain a multi-tenant database comprised of sales data from our ecommerce business owners. That’s millions of sales. This gives us an overview of general trends within the industry across marketplaces, platforms, and niches. We extracted an SQL query of all sales data between November 25th and December 2nd minus POS systems, ensuring that our conclusions would be specific to ecommerce.

The goal? Discover what’s fact and what’s opinion behind the Black Friday vs. Cyber Monday debate and create a seller resource that allows retailers to be more methodical in their Cyber Monday strategy.

And I have to admit that looking at these data reports had me replacing my turkey with a big helping of crow. Cyber Monday is king.

Focus Your Efforts on Cyber Monday

ecommerce-sales-week

The buying public is biting hard at the Cyber Monday lure. While Black Friday does stand tall with over 1.5 times the sales and transactions of the previous day, Cyber Monday towers over the entire week, sticking out like a pimple on prom night. Nearly 2.5 times the sales and transactions occurred on Cyber Monday as on Thanksgiving Day. In fact, the Cyber Monday fallout stretching into Tuesday is nearly as good of an e-tail day as Black Friday.

But what does this all mean? How can you apply it in 2016 to increase your sales and maximize on perhaps the most important week of the year for your business?

Here are four actionable tips to get you started. These don’t require any expensive software systems or a huge amount of expertise, but they go a long way on capitalizing off the data-proven buying habits of shoppers during the first week of the holiday season. I’ve also provided some great examples of Cyber Monday sales from throughout the years from deep in my inbox. For extra fun, I only picked examples that personally made me convert. Let’s dive in.

Have Your Email Marketing to Inboxes by 6AM

The first thing I do every morning is check my email, and I’m not the only one. Smartphone usage for email spikes in the morning around 6AM according to data compiled by Movable Ink.

email-opens-by-device-time-of-day

That explains why our data found that Cyber Monday begins at 7AM. People are waking up, immediately checking their phones, and making purchases. The sales eclipse the transactions for the next three hours, indicating customers may be more receptive to your email marketing efforts for big ticket items in the morning.

cyber-monday-hourly

Data found by Marketing Charts drives the point home further. Average email open rates begin their daily upswing at 6AM and peak at 10AM.

open-rates-by-hour-marketing-charts

By the time your potential customers wake up, you need to have you email marketing efforts right in front of them. Why waste time? Feature your biggest ticket items and your best sales right off the bat. This example from Journeys hit my inbox at 2:10AM. It caused me to buy a pair of cream-colored Converse All-Stars. It shows us a couple of great ideas about how to cut through the sleepiness of someone’s brain and claim an early morning conversion.

journeys-free-shipping

What I find really interesting here is that Journeys doesn’t include a product photo. The email sells the deal rather than clothes. It reads as almost more of an announcement than an advertisement. There are three more replicable techniques for an early morning Cyber Monday email we can find here.

  1. Make the offer provocative and enticing. Words like “free” and “X% off” are sure to wake up your customers.
  2. Shove that offer directly and explicitly at your reader. Big, bold letters are a must.
  3. Dark colors that won’t blind your reader are a great idea. An email with a lot of bright colors might hurt their eyes and cause them to put down their phone.

Advertise a Lunch Break Flash Sale on Twitter

Going back to our hourly data, we can see that the most money is being made around lunch time. 1PM to 3PM is the largest peak you’ll see throughout all of Cyber Monday.

Conveniently, Hubspot has found that 12PM to 3PM on weekdays is Twitter’s most active period. Launching a 12-hour flash sale on Twitter at 12PM is a great way to get a great deal in front of the most customers at the time when they’re statistically most likely to convert. It’s a trifecta of data-driven methodology.

Use the hashtags #cybermonday, #flashsale, as well as any other relevent hashtags for your brand. Include an image, especially if you’re able to include it as an embedded link. I bought this wonderfully nerdy t-shirt for an English teacher friend of mine last Christmas. I was browsing the #flashsale hashtag on Twitter during my lunch break. The limited time offer and the fact my lunch break was also limited increased my urgency, leaving me less time to waffle and potentially abandon my cart.

//platform.twitter.com/widgets.js

Perhaps you’re a little wary of putting eggs into your social media basket. You’ve got that big fancy email list, but perhaps you’ve relied on it a little too much. Keep in mind that your customers are going to be bombarded all day with sale after sale in their inbox. You don’t want to blend into the background noise. Moving some of your marketing efforts over to social media gives you an opportunity to attract new customers on an open platform, Type A buyers who are looking for Cyber Monday sales. With that in mind, apply these three tips.

  1. Attach the flash sale to a lower selling item, or one in which you have excess inventory. Don’t risk it on a high selling item, especially if this is your first flash sale.
  2. Use Twitter’s audience management tools to create a targeted Twitter ad to promote your flash sale.
  3. The shorter the time for your flash sale, the more urgency you create for the buyer. On the other hand, they have less time to see the sale. It’s a delicate balance.

Send Out an End-Of-Day Marketing Email

After the work day ends, customers begin to spend less money. The number of overall transactions spikes at 7PM as a result of people getting off work who perhaps are in jobs where they’re not able to online shop on their lunch break. Similar spikes occur at 10PM and 11PM as the slowpokes among us suddenly remember its Cyber Monday, or finally have time to sit down and shop. That’s why you should send out one more marketing email at the end of the work day to capitalize on this group of buyers.

“But what about bombarding my customers? Won’t they get annoyed if I email them twice in one day?”

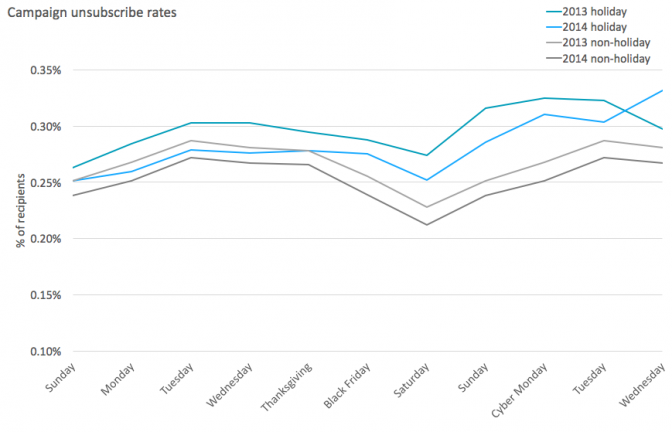
On Cyber Monday, they don’t. Mailchimp notes that the overload of email offers decreases open rates across the industry on Cyber Monday, but don’t significantly increase unsubscribe rates. They go on to note that the best way to get yourself noticed is to send more emails than normal. This is not the time to be quiet and hope you’ll get noticed. There’s too much money on the line to be timid.

campaign-unsubscribe-rates(Image Source)

This sleek AT&T Cyber Monday sale landed in my inbox at 4:15PM. We were desperately trying to introduce some technology into my dad’s life at the time, so this seemed like the perfect present. Notice how they lead with the FREE tablet. I also really like the messaging that this is where the holiday cheer is “starts,” as it implies a season’s worth of deals and shopping is to come.

att-holiday-email-advertisement

Another key takeaway here is bundling your items. Since people seem to spend less in the evening, but the total transactions increase, it’s important that you can get as much as you can out of each transaction. Bundling items together means you can charge more for each transaction.

AT&T is technically doing two different bundles here, one much subtler than the other. Not only are they bundling the tablet and the phone, but they’re also offering a $200 credit. What could you use that $200 credit on? Maybe some of those wearables they advertise below. AT&T is not only bundling their products, but bundling the sale itself. A three step series of purchases that starts with the headline FREE is great marketing from this mobile giant.

Getting one last email out completes a nice full days’ worth of Cyber Monday digital marketing. Let’s make sure we’ve got our Cyber Monday marketing timed out to perfection.

kissmetrics-watch

You’ve taken advantage of the early birds, the night owls, and the lunch… larks? Being an active seller throughout the day ensures that you’re getting the most of out the holiday.

Allow Customers to “Earn” Free Shipping Rather Than Giving It Away to All

I’m a big believer in free shipping. What it does for ecommerce conversions is undeniable at this point. It’s worth the cost. According to Compete.com, over 93% of customers cited it as a factor that would make them more likely to buy an item. The same study found that 38% of customers found the shipping cost to be the least satisfactory part of their shopping experience.

free-shipping-increase-sales(Image Source)

Our own research, however, appears to suggest perhaps buyers aren’t as sensitive to shipping costs as they say they are. We found that offering free shipping does not move the needle on your sales throughout the week of Cyber Monday.

percentage-free-shipping

I’ve got two theories as to why this is. The first is that Cyber Monday may be attracting some non-traditional online buyers. Those of us who shop online often throughout the year know that if one vendor isn’t offering free shipping, it’s probably worth the time to find a similar item with a vendor willing to ship for free. Cyber Monday shoppers may not be familiar with this, so it doesn’t become a major factor in whether or not they convert.

My second theory is that the event of Cyber Monday is outweighing the normal aversion to paying for shipping. People want to feel as if they are a part of something. It could make them less prudent than normal and more prone to paying for shipping, especially if they perceive the deal as being worth it.

Either way, we can make a few data-driven decisions based on this info. We could of course just take away free shipping altogether for the week of Cyber Monday. Customers are willing to pay for it, so we might as well just take their money, right? That feels a little wrong though, doesn’t it? After all, the benefits of free shipping outweigh the negatives. It’s good for the customers and the sellers.

With that in mind, offer customers a chance to “earn” free shipping. Check out what WWE Shop sent me on a Cyber Monday a few years back.

wwe-shop-cyber-monday-sale

WWE Shop set the free shipping limit to $15. Doing something similar with your business will allow you to increase the value of each transaction. Buyers may spend more to get the free shipping, and transactions that remain below $15 will be less expensive for you to process.

Consider other ways you can allow your customers to earn free shipping, such as in exchange for filling out a customer experience survey, registering on your site, or bundling the item with a less popular item.

Conclusion

Let me sum up all these graphs and examples for you as simply as possible.

  • Cyber Monday is a phenomenon, not a flash in the pan.
  • Be methodical about your digital marketing to capitalize on sales spikes throughout the day.
  • Allow customers to earn free shipping rather than giving it away to everyone.

I think data is beautiful, especially data that makes us money. By going about your selling in a data-driven manner, you can take full advantage of Cyber Monday. We’ll most likely see sales spike on this ecommerce holiday. But wasted motion is wasted money. Don’t fumble around in the dark and hope you’ll stumble on profit. Use these hacks instead, experiment to see which works best for you, and make Cyber Monday your best sales day of the year.

About the Author: Dion Beary writes about ecommerce for ecomdash, a software company that automates inventory management for small businesses selling online. His passions are Twitter, casseroles, and 00’s rap.

from The Kissmetrics Marketing Blog http://ift.tt/2f6Lh60


from WordPress http://ift.tt/2fBrQ5X

Applying artistic facial effects to images on the fly

Ever wished you could add snapchat like effects on your images?

Good news is, you actually don’t need extensive training or specific face detection skills to get started. All you need is Cloudinary. Cloudinary is a cloud-based image management solution that gives you the power to upload, store, manipulate, optimize and deliver images. It also enables you to apply advanced effects and filters using if/else conditions, like the one we are going to use today.

In this article, you will learn how to apply face effects, by adding a Movember mustache using Cloudinary’s conditional transformation feature:

1

 
Image with a face

2 
Image without a face (mustache is added down-right)

Getting started

Before you see some codes, we should do some housekeeping so we can move ahead smoothly. Our demo will be built using JavaScript. Before we start, we will need to set up a Cloudinary account, which gives us enough free storage and transformation capabilities.

The Cloudinary account

Our Cloudinary account will enable us to upload, store and access our images via the API. You can sign up for a free account, then store your credentials in a safe place. The credentials are stored on the dashboard as shown:

Project setup

As mentioned earlier, we will have a demo, so you can better envision how Cloudinary works and have a practice playground.

The project structure is going to be a very simple one, with just a server and three client files:

|---movember
|-------index.html # Home page
|-------script.js # JavaScript here
|-------style.css # CSS here

We need to include jQuery, Cloudinary upload widget and Cloudinary jQuery library in our HTML:

<!-- ./index.html -->
<html>
<head>
    <title>Get a Momember</title>
    <link rel="stylesheet" href="style.css">
</head>
<body>
    <!-- Content will go here -->
    http://ift.tt/2cUWoxy
    http://ift.tt/2e9seUd
    //widget.cloudinary.com/global/all.js
    http://script.js
</body>
</html>
  • widget.cloudinary – loads the upload widget to our document and includes other supporting functionalities.
  • jquery.cloudinary – is jQuery plugin that serves as an SDK tool for managing and manipulating cloud images.

The jQuery library is imported first because the Cloudinary jQuery plugin, and our own custom script.js file will depend on it.

Configuring Cloudinary

Cloudinary configuration is easy. We just call the .config method and pass it the credentials we copied from the dashboard:

$(function() {
    // ./script.js
    // ......
    // Configure Cloudinary
    // with credentials available on
    // your Cloudinary account dashboard
    $.cloudinary.config({ cloud_name: 'CLOUD_NAME', api_key: 'API_KEY'});
})

Be careful with the API_SECRET (which must not be used in client-facing applications)! Any user that has the credentials has access to your image cloud.

Image Upload

Images will be sent to Cloudinary via Ajax request using the upload widget. We can initiate this request from the markup, so let’s create some:

<!-- ./html -->
<!-- Container for both form and loader -->

Movember

Upload a selfie to get a mustache for free!

Take or Upload a Selfie
</div> </div>

Our markup just has 2 significant elements: a button to open the upload widget for selfies, and a canvas to drop the image once the upload is successful.

We could also add minimal style to pull everything to the center of the page:

// ./style.css
.container{
    border: 2px solid #e1e1e1;
    width: 40%;
    margin: auto;
    margin-top: 5em;
    text-align: center;
    padding-top: 5em;
    padding-bottom: 5em;
}
/* Button style truncated for brevity */

Once you run/open the application, your app should look like the following:

Upload with Cloudinary widget

The Cloudinary widget has been setup and loaded in our browser. Let’s see how we can use it to initiate an upload:

// ./script.js
$(function(){
    // Upload button
    var uploadButton = $('#upload-button');
    // Upload button event
    uploadButton.on('click', function(e){
        // Initiate upload
        cloudinary.openUploadWidget({ cloud_name: 'CLOUD_NAME', upload_preset: 'PRESET'},
        function(error, result) {
            if(error) console.log(error);
            // If NO error, log image data to console
            console.log(result);
        });
    });
});

The widget library exposes cloudinary which has an openUploadWidget property. This property takes a config and a callback function to handle upload success or failure.

The config requires the cloud name to upload to and an upload preset. The upload preset is just a pre-configuration to what we could have been setting up via parameters in the REST URLs. We set this configuration and using a unique ID to differentiate them from each other. To set yours, go to Settings >> Upload Tab >> Upload Presets >> Enable. You can read more about it here.

Once you have this wired, you can click the upload button:

Select an image and upload. Open up the developer tool and have a look at the console tab. You would see an array with an item containing the image details.

Information logged to the console is not very useful. Let’s drop the image in the browser.

Apply the face effect with conditional transformation

Before we jump to the exciting part, let’s grab a reference to the canvas where we will be putting the image.

// ./script.js
var canvas = $('#canvas');

Now, the next time we want to upload, we will put the image right into the document:

uploadButton.on('click', function(e){
    cloudinary.openUploadWidget({ cloud_name: 'CLOUD_NAME', upload_preset: 'UPLOAD_PRESET'},
    function(error, result) {
        if(error) console.log(error);
        var id=result[0].public_id;
        canvas.html(procesImage(id))
    });
});

The processImage method just returns an image from your cloud:

function processImage(id){
    var options = {/* Transformation option can go here */};
    return $.cloudinary.image(id, options);
}

Next up is the long awaited part. Let’s add a mustache to the face.

To do so, we need to extend our processImage function by adding transformation property to the options. The transformation property is where we tell Cloudinary that we would love to get a mustache.

function procesImage(id){
    // Get a random mustache image
    var movembers = ["movember3_oabbz1", "movember2_mc2zrb", "movember_qimgkg"];
    var random = Math.floor(Math.random() * movembers.length);
    var randomMovember = movembers[random];
    var options = {
        // Transformation option
        transformation:
            [
             // Specify desired width
             {width: 400},
             // Check if faces (if faces >= 1)
             {if: "faces_gte_1"},
             // Add movember image.
             // Mustache will be placed right
             // in the middle of the face so we can push
             // it down a little below the nose
             {overlay: randomMovember, width: 1.1, flags: "region_relative", gravity: "faces", x:0, y:50},
             // If the image is not a face
             {if: "else"},
             // drop the mmustache at the
             // lower-right section of the image
             {overlay: randomMovember, width: 100, gravity: "south_east"},
             // End if statement
             {if: "end"},
             // Add a border and a border-radius
             {border: "7px_solid_grey", radius: 30}
             ]
        };
    // Return image with the options
    // Image is returned in an image tag
    // and not as a URL
    return $.cloudinary.image(id, options);
}

An important part is the transformation array, because some of its values are used to make decisions and apply the mustache to the uploaded image. If the image contains no face, the mustache will be placed at the bottom-right of the image.

To make the app more interesting, we get a random mustache from our cloud storage, rather than just using single mustache. When we set gravity to faces, in order to apply the mustache to all faces, the mustache will end up at the center of the faces rather than below the nose. For this reason, we use the y property to push the mustache down a little.

Demo

//jsfiddle.net/chris92/h69d2ny4/embedded/

Also available on GitHub

Conclusion

In this example, we focused on a particular aspect applying effects and filters using face detection and if/else statements. There are many other amazing conditional transformations you can do with Cloudinary. Feel free to read more and explore what options Cloudinary has for you.

[— This is a sponsored post on behalf of Cloudinary –]

Hot Autumn Stuff Collection of 50+ Fonts & 300 Graphic Objects – only $17!

Source

p img {display:inline-block; margin-right:10px;}
.alignleft {float:left;}
p.showcase {clear:both;}
body#browserfriendly p, body#podcast p, div#emailbody p{margin:0;}

from Webdesigner Depot http://ift.tt/2e9oWjS


from WordPress http://ift.tt/2fAnlIM